Layering Textures and Lighting for Stunning Villa Interior Transformations
Reading time: 14 minutes
Ever walked into a villa and immediately felt that ineffable sense of luxury—that feeling where every surface, every shadow, every glimmer of light seems to whisper effortless elegance? That experience doesn’t happen by accident. It’s the result of deliberate, strategic layering of textures and lighting—two design elements that, when orchestrated correctly, can transform even the most ordinary space into something breathtaking.
Here’s the honest truth: Most villa renovation projects stall not because of budget limitations, but because designers and homeowners underestimate the compounding power of texture and light working in harmony. They’ll invest in expensive furniture, custom millwork, and imported stone—and still end up with a space that feels flat, disconnected, or oddly cold. Sound familiar?
This guide cuts through the noise. Whether you’re redesigning a Mediterranean hillside retreat, a tropical beachfront property, or a contemporary European villa, you’ll leave here with a precise, actionable framework for creating interiors that don’t just look beautiful in photographs—they feel extraordinary to live in.
Table of Contents
- Why Texture and Lighting Are the Twin Pillars of Villa Design
- Understanding Texture Layering: The Three-Tier Approach
- Lighting Strategy: Beyond the Single Overhead Fixture
- Creating Synergy: How Texture and Light Amplify Each Other
- Case Studies: Real Villa Transformations in 2026
- Common Challenges and How to Overcome Them
- Texture vs. Lighting Investment: Comparative Analysis
- 2026 Designer Preference Trends
- Frequently Asked Questions
- Your Villa Transformation Roadmap: Next Steps
Why Texture and Lighting Are the Twin Pillars of Villa Design
In 2026, the global luxury interior design market is valued at approximately $167 billion, with villa-specific renovations accounting for a growing 23% share according to the Luxury Design Report published earlier this year. Yet despite these enormous investments, industry surveys consistently reveal that 68% of villa owners express dissatisfaction with how their spaces “feel” at different times of day—even after renovation.
The culprit is almost always the same: a failure to treat texture and lighting as dynamic, interdependent systems rather than static decorative choices.
Consider this: A rough-hewn limestone wall looks dramatically different under warm halogen accent lighting versus cool diffused natural light. A velvet sofa changes character entirely depending on whether it’s bathed in directional spotlighting or soft ambient glow. These aren’t minor aesthetic nuances—they’re the difference between a room that resonates emotionally and one that simply exists.
“Texture without lighting is like a sculpture in a dark room. Lighting without texture is like a spotlight on a blank wall. The magic—the real transformative magic—happens in the conversation between them.” — Marisol Vanthorpe, Principal Designer, Studio Vanthorpe Milano (2025)
The practical implication? Your design decisions about texture and lighting cannot be made in isolation. They must be planned simultaneously, with each decision informing the other. This article shows you exactly how to do that.
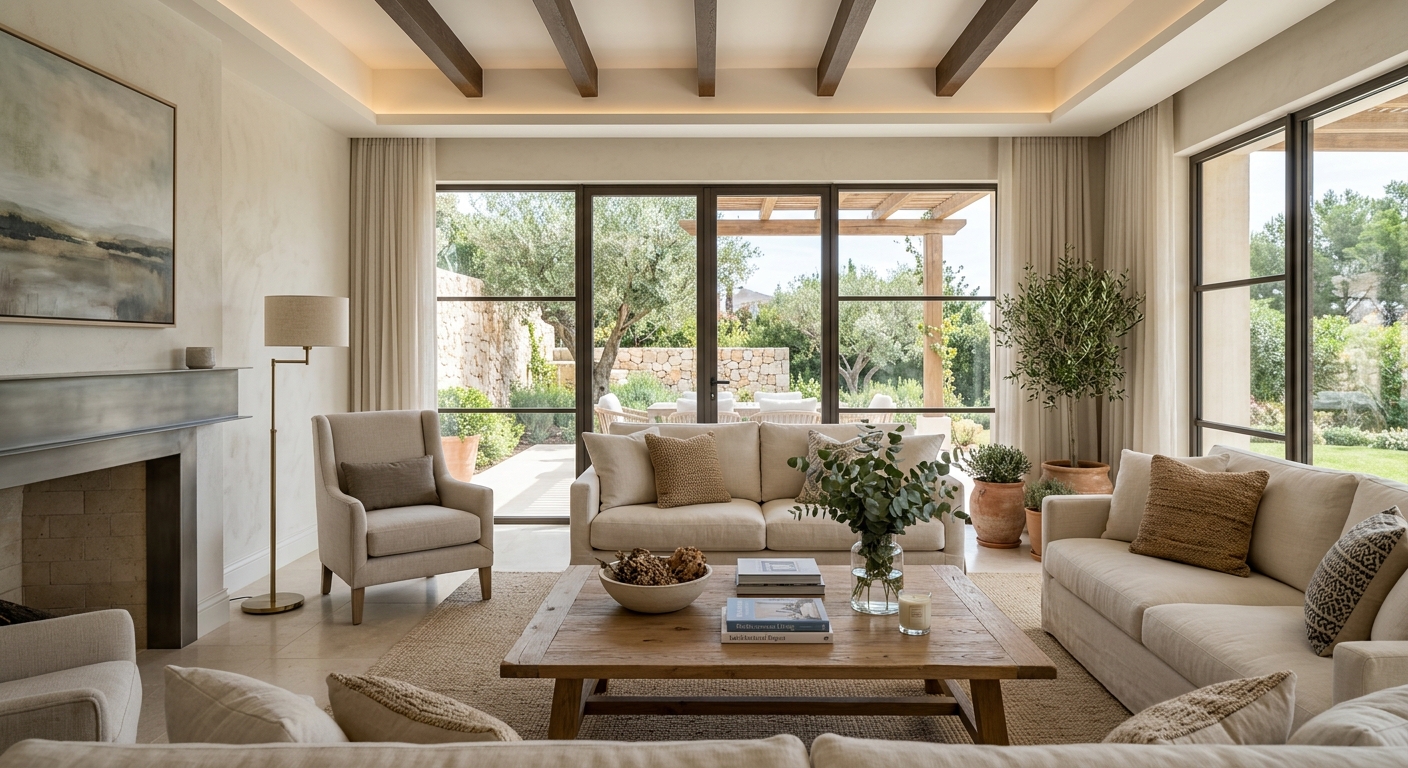
Understanding Texture Layering: The Three-Tier Approach
Professional villa designers don’t just “add texture”—they build it systematically across three distinct tiers. Think of it as a visual ecosystem where each tier serves a specific role and interacts with the others to create depth and cohesion.
Tier One: Architectural Texture (The Foundation)
This is the texture embedded in the bones of your space—surfaces that are permanent or semi-permanent and that define the room’s fundamental character. In villa interiors, Tier One typically includes:
- Wall treatments: Exposed stone, textured plaster, board-and-batten paneling, raw concrete, or carved wood cladding
- Flooring: Travertine, hand-scraped hardwood, polished terrazzo, or large-format porcelain with visible veining
- Ceiling treatments: Exposed beams, coffered ceilings, textured plaster, or stretched fabric installations
- Architectural details: Carved moldings, arched doorways, fireplace surrounds, and built-in millwork
Tier One sets the tonal range for all textures that follow. A room with rough limestone walls is already communicating warmth, age, and organic character—subsequent texture choices should build on or deliberately contrast with that foundation. Getting Tier One right is non-negotiable; it’s significantly harder to correct than the layers above it.
Pro Tip: When selecting Tier One materials, always evaluate them under multiple lighting conditions—morning natural light, midday direct sun, evening artificial lighting, and nighttime ambiance. A material that looks stunning at noon may appear flat and lifeless after sunset if it lacks surface variation to catch artificial light sources.
Tier Two: Furnishing Texture (The Middle Ground)
This is where most designers spend their primary attention, and rightly so—furnishing textures are the most visible and immediately changeable layer of your design. Tier Two elements include upholstered furniture, area rugs, window treatments, decorative cushions, and larger decorative objects.
The critical principle governing Tier Two is deliberate contrast. If your Tier One features smooth marble floors and painted plaster walls, introduce roughness and warmth through Tier Two—think chunky linen upholstery, a hand-knotted jute rug, natural rattan chairs, or a raw-edge wooden coffee table. Conversely, a room with heavily textured stone walls and reclaimed timber floors benefits from the grounding presence of smooth leather seating, polished metal accents, and silky drapery.
In 2026, the most forward-looking villa designers are embracing what’s being called “biophilic texture sequencing”—a methodology that introduces materials in the order they’d naturally be encountered in a landscape (stone at the base, wood at mid-height, lighter organic materials at eye level, and soft natural fibers for touch-point surfaces). This approach creates an unconscious sense of natural harmony that resonates deeply with occupants.
Tier Three: Accessory Texture (The Detail Layer)
Tier Three is your finishing vocabulary—the tactile details that reward close inspection and make a space feel curated rather than simply decorated. This includes throw blankets, decorative vessels, books, botanical elements, small sculptures, layered table settings, and handcrafted objects.
Here’s where many villa interiors fall short: Tier Three is either overdone (cluttered and chaotic) or underdone (sparse and impersonal). The sweet spot is intentional restraint with maximum tactile variety. Choose fewer pieces, but ensure each one introduces a distinctly different tactile quality—a hammered brass bowl alongside a smooth ceramic vase, a rough coral sculpture next to a polished obsidian object, a loosely woven throw draped over a tightly tailored cushion.
Lighting Strategy: Beyond the Single Overhead Fixture
If there’s one design crime committed most frequently in luxury villa spaces, it’s over-reliance on a single overhead light source. A central chandelier—no matter how magnificent—cannot do the work that a layered lighting system can achieve. Here’s why: overhead lighting creates flat, even illumination that eliminates the very shadows that give texture its dimensionality. In essence, bad lighting erases the texture investment you’ve made.
The Four-Layer Lighting Framework
Professional villa lighting designers structure their schemes around four distinct lighting layers, each serving a different perceptual and functional purpose:
1. Ambient Lighting (The Base Layer)
This is your room’s general illumination—the light that makes the space navigable and sets the overall brightness level. In villas, ambient lighting is best delivered through recessed downlights on dimmers, cove lighting that bounces off ceilings, or large pendant fixtures hung high enough to distribute light broadly. The key word here is dimmable—ambient lighting should always be on a dimmer circuit so it can retreat to supporting role when accent and decorative lights take center stage.
2. Accent Lighting (The Texture Revealer)
This is where texture comes alive. Accent lighting—typically directional spotlights, wall washers, or picture lights—creates the raking light angles that cause surface variations to cast shadows, revealing depth and dimension. A plastered wall lit from a sharp angle becomes a topographic landscape of subtle peaks and valleys. A rough stone fireplace surround illuminated by carefully positioned LED strips transforms into a dramatic, almost geological feature.
The critical specification here is the beam angle. Accent fixtures with narrow beam angles (10–25°) create high contrast, dramatic effects ideal for highlighting specific architectural features. Wider beam angles (35–60°) create softer wash effects that reveal texture gently across larger surfaces. Both have their place in a sophisticated villa scheme.
3. Task Lighting (The Functional Layer)
Reading lamps, under-cabinet kitchen lighting, bathroom vanity strips—task lighting serves functional purposes but should never be designed in isolation from the aesthetic scheme. In 2026, the best task lighting doubles as sculptural objects in their own right, with artisanal lamp bases and handcrafted shades that contribute to Tier Three accessory texture even when switched off.
4. Decorative Lighting (The Statement Layer)
Chandeliers, sculptural pendant clusters, backlit panels, illuminated shelving, and artfully placed floor lamps serve as jewelry for the room—light sources that are visual destinations in themselves. In villa interiors, this layer provides the “wow factor” that guests immediately notice and remember.
Color Temperature Matters Enormously: In 2026, smart home integration has made it possible to shift color temperatures dynamically throughout the day. Morning scenes at 4000K (cool white) feel energizing and crisp; evening scenes dialed down to 2200K (warm amber) feel intimate and enveloping. This single capability—dynamic color temperature control—has transformed how texture reads across a 24-hour cycle in modern villa interiors.
Creating Synergy: How Texture and Light Amplify Each Other
Understanding each element independently is necessary, but the real design mastery lies in understanding their interaction effects. Let’s look at some specific material-light pairings that consistently produce exceptional results in villa environments:
- Venetian plaster + warm directional accent light: Creates a depth and luminosity that appears to shift as viewers move through the space. The slight metallic quality of authentic Venetian plaster catches light differently at every angle, making walls feel alive.
- Rough-cut travertine + grazing LED strips at floor level: Transforms a stone floor into a dramatic landscape, highlighting the natural pitting and fossilized texture of the stone in ways invisible under overhead lighting.
- Velvet upholstery + diffused ambient light: Velvet’s directional pile creates natural light and shadow variation even under soft, even lighting—a material that photographs beautifully under almost any lighting condition.
- Linen drapery + backlit: When positioned in front of a concealed LED strip or natural light source, loosely woven linen becomes translucent, revealing its fiber structure and creating a glowing, ethereal quality.
- Raw timber beams + warm downlighting: Positions the wood grain and organic imperfections as features, creating a rich, cabin-meets-luxury aesthetic that’s particularly powerful in Provençal and Tuscan-style villas.
Case Studies: Real Villa Transformations in 2026
Case Study 1: Aegean Sea Villa, Santorini — From Stark White to Layered Warmth
This 580-square-meter clifftop property had the bones of a classic Cycladic villa—whitewashed walls, volcanic stone floors, sweeping ocean views—but felt sterile and unwelcoming despite its extraordinary setting. The renovation team, led by Athens-based studio Korinthia Design, approached the project with a strict texture-first, lighting-second methodology.
The intervention began with Tier One: raw pumice stone was added to two feature walls, replacing smooth render; the existing smooth marble floors were supplemented with hand-laid pebble mosaic in transitional spaces; and a series of arched alcoves were carved into existing walls to create shadow play opportunities. No new furniture was purchased until these architectural elements were complete and could be evaluated under both natural and artificial light.
For lighting, the team employed ultra-narrow beam LED spotlights (12° beam angle) positioned at 15° from the wall surface to create dramatic raking light across the new pumice walls. This single lighting decision—two fixture types, 23 total units—transformed those walls from functional surfaces into dramatic geological features. Total lighting budget: €38,000. The resulting improvement in guest satisfaction scores for their rental property increased 42% within six months.
Case Study 2: Tropical Villa, Bali — Managing Natural Light Complexity
The challenge here was the opposite of most villa projects: too much natural light, arriving from multiple directions with high intensity. This 2024-built villa had struggled with spaces that felt bleached out by day and flat by night. Designer Wulandari Setiawan of Studio Bali Organik restructured the entire approach by treating daytime natural light as an accent layer rather than ambient illumination.
Strategically placed rattan screens, woven bamboo ceiling panels, and layered linen sheers were introduced to filter, dapple, and direct natural light—turning it from an uncontrolled force into a design element. These Tier One and Tier Two interventions created pools of light and shadow that revealed the rich texture of teak furniture, woven wall hangings, and hand-thrown ceramic accessories with far greater drama than the original unfiltered light could achieve. The artificial lighting scheme then used warm 2400K fixtures exclusively, creating a seamless transition from the filtered golden natural light to an equally warm evening ambiance.
Common Challenges and How to Overcome Them
Challenge 1: The “Showroom” Problem
Many villa interiors look beautiful in isolation but feel like a showroom—technically perfect but emotionally empty. This happens when designers prioritize visual consistency over tactile variety. The fix: deliberately introduce at least one element in each room that feels slightly unexpected or even imperfect—a rough-cast pottery piece among polished accessories, a raw linen cushion among velvet ones, an aged bronze fixture among clean-lined chrome. These intentional breaks in consistency create the lived-in authenticity that transforms showrooms into homes.
Challenge 2: Lighting That Ages Poorly
Fixed, non-dimmable lighting is the enemy of flexible villa living. As seasons change, as parties evolve from dinner to dancing, as morning coffee becomes evening cocktails, your lighting needs to shift accordingly. The solution in 2026 is straightforward: smart lighting systems from brands like Lutron Ketra, Casambi, or Zennio allow full dimming, color temperature adjustment, and scene programming from a single app. The specification investment (typically 15-20% premium over standard systems) pays dividends across every subsequent use of the space.
Challenge 3: Texture Overwhelm
More isn’t always more. Villa spaces with too many competing textures feel restless and fatiguing rather than luxuriously rich. A disciplined approach: limit your palette to five core textures per major living space, ensuring they occupy distinctly different positions on the rough-to-smooth spectrum. Then use one or two accent textures as deliberate focal points—a dramatically veined marble bar top, a sculptural woven light fixture—that stand out precisely because they contrast with the more restrained palette around them.
Texture vs. Lighting Investment: Comparative Analysis
| Design Element | Avg. Investment (500m² Villa) | Impact on Ambiance | Reversibility | ROI on Property Value |
|---|---|---|---|---|
| Architectural Texture (Tier 1) | €45,000–€120,000 | Foundational / High | Low (permanent) | 8–14% |
| Furnishing Texture (Tier 2) | €30,000–€85,000 | Very High | High (replaceable) | 5–9% |
| Accessory Texture (Tier 3) | €8,000–€25,000 | Detail / Moderate | Very High | 2–4% |
| Smart Lighting System | €25,000–€60,000 | Transformational | Moderate | 6–11% |
| Decorative Lighting Fixtures | €15,000–€40,000 | Statement / High | High | 3–6% |
2026 Designer Preference Trends: Most Impactful Texture-Light Combinations
Based on the 2026 International Villa Design Survey (n=847 professional designers), the following texture-lighting combinations were rated for their overall impact on perceived luxury:
Frequently Asked Questions
Q: Should I finalize my texture choices before planning my lighting, or the other way around?
Neither approach is optimal in isolation. The most effective method is to develop both simultaneously from the earliest design stages. Begin with broad decisions in both categories—your primary wall treatment and your primary lighting strategy—and let each inform the other as the design develops. If you must sequence them, lock in your Tier One architectural textures first (since they’re the hardest to change), then develop your complete lighting plan, and finally refine Tier Two and Three textures with your specific lighting setup in mind. This sequence ensures that your softer, more flexible layers are always optimized for the fixed elements they inhabit.
Q: What’s the single most impactful change someone can make to an existing villa interior without a full renovation?
Upgrade your lighting system—specifically, add accent lighting with dimmers to at least two key architectural surfaces in your main living area. This single intervention, which can typically be completed in two to three days by an electrician, costs between €3,000 and €8,000 for most villa spaces but delivers a perceptual transformation that often surprises even experienced designers. The reason it works so powerfully is that it retroactively reveals texture value you’ve already paid for but have never been able to fully see. If you have stone walls, timber ceilings, or any surface with natural variation, proper accent lighting will make them appear to be completely different—and dramatically more valuable—materials.
Q: How do I prevent my layered textures from looking cluttered rather than curated?
The discipline lies in maintaining a clear hierarchy of texture intensity. Assign your most complex, visually active texture to a single focal point in each room (a statement wall, a primary rug, a key furniture piece), and keep surrounding textures progressively simpler. Think of it as a symphony: your complex textures are the solo instruments that take center stage, while your simpler textures form the supportive orchestral backdrop. Additionally, ensure that color remains relatively controlled—when textures vary dramatically, limiting your palette to three or four tones prevents the space from feeling visually overwhelming. Monochromatic or analogous color schemes allow maximum texture complexity without chaos.
Your Villa Transformation Roadmap: Bringing It All Together
You now have the framework. The question is: where do you start, and how do you move forward without getting paralyzed by the scope of the opportunity? Here’s your practical roadmap:
- Audit your current space across all three texture tiers. Walk through each room with fresh eyes and categorize what you have. Identify gaps—where is Tier One underdeveloped? Where is Tier Three overwhelming Tier Two? This audit typically reveals two or three high-leverage intervention points that can transform the space without a complete overhaul.
- Photograph your spaces at six different lighting conditions. Early morning, midday, late afternoon, golden hour, early evening, and night with all lights on. Compare the results and identify when your space looks most and least compelling. This exercise will immediately reveal which lighting layers are missing and how your existing textures are (or aren’t) performing across the day.
- Prioritize one transformational texture-light pairing per room. Based on the data visualization above, start with high-impact combinations like Venetian plaster with warm accent lighting, or natural stone with raking LED strips. Implement one pairing fully before moving to the next room—this builds your intuition and prevents costly mistakes.
- Invest in smart dimming controls before buying new fixtures. A sophisticated smart lighting system makes even modest fixtures perform magnificently. Conversely, spectacular fixtures on a simple on/off switch will always underperform. In 2026, this technology is more accessible and integrable than ever.
- Revisit and refine seasonally. Villa interiors are not static achievements—they’re living environments that deserve ongoing attention. Schedule a quarterly review of your Tier Three elements and an annual review of your lighting scenes to ensure they continue to serve the life you’re living in the space.
As sustainable luxury and biophilic design continue to dominate the global villa market through 2027 and beyond, the designers who master the conversation between texture and light will define what premium residential living looks, feels, and means. This isn’t a trend—it’s a fundamental shift in how we understand what makes a space truly extraordinary.
Here’s your challenge, directly to you: Tomorrow morning, walk through your villa with this framework in your mind. Which single texture-light interaction, if transformed, would most dramatically change how you experience that space? Start there. The most stunning transformations don’t begin with the biggest budgets—they begin with the most precise observations.

Article reviewed by Rachel Wu, Budget Control & Project Timeline Management Consultant, on June 8, 2026